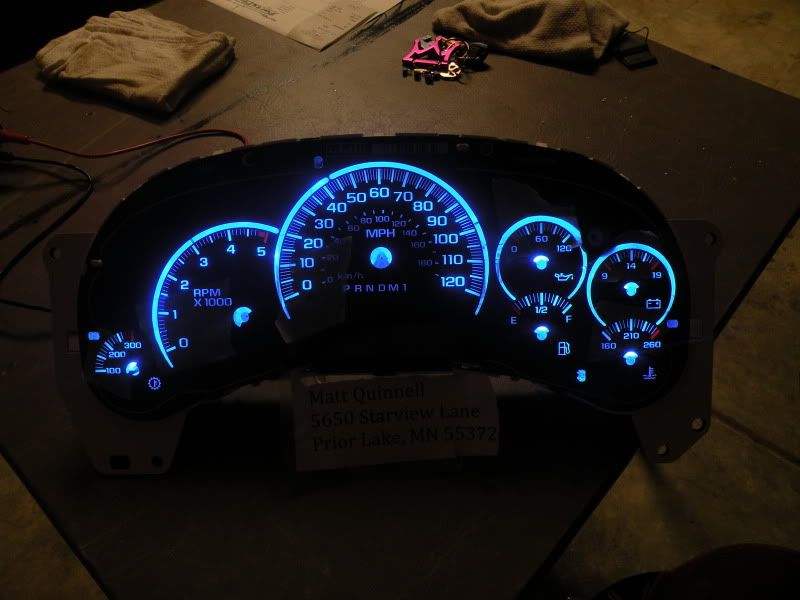
Got the idea from Scottyboy over on GMFS. Although I don't think hes made a "how to" on it, I found a thread on FSC to do this.
After alot of trial in error, and missing information on the other How to's I decided to make this one.
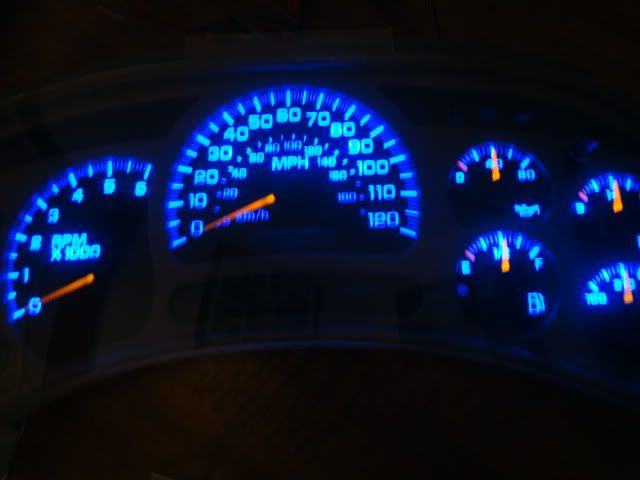
This is not as hard as it seems!!!
It took me about 2 hours the first time I did this, the second time it took me around 45 minutes.
It takes patients and a steady hand to complete.
I'm 18 and have no background of working with this kind of stuff, just goes to show you that it really isnt all that bad.
I went deeply into detail so clear up any confusion there may be.
I'M NOT RESPONSIBLE FOR ANY DAMAGE YOU MAY CAUSE YOUR CLUSTER.
First you will need:
-7MM ratchet and long enough extension to remove the 4 screws holding the Cluster in place.
-A stout fork... yes the eating utensil
-Flat head screw driver or something to push/pull tabs to take apart your cluster
-Soldering Iron no more than 30 watts as it will get too hot (available at most auto parts stores and wally world)
-Solder
-A pick or something with a pointy end to help move position solder and the LED
-A steady hand and patients
-Sharpie
-Scotch Tape
-8 LEDs 5MM, color of your choice. (always order extra for repairs or accidents... they are cheap!)
I used Oznium Super Bright LEDs
-8 470 Ohm resistors (once again order extra) Resistors
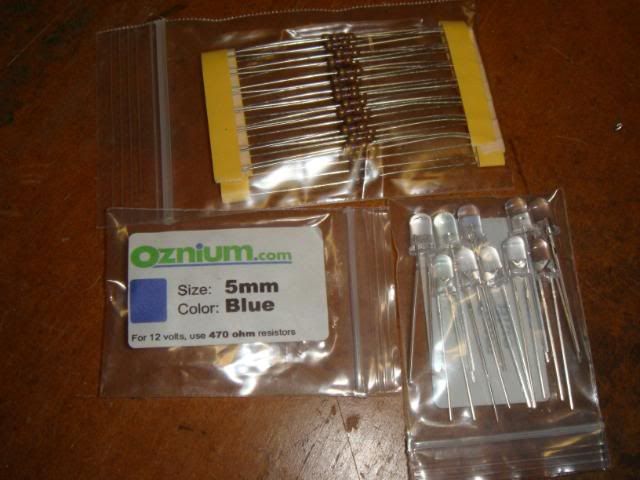 (taken from scottyboy)
Ok lets get started.
First remove the dash bezel.
Remove the 4 screws with the 7MM that hold the Cluster in place.
Unplug the cluster from the rear.
CARRY THE CLUSTER FLAT AND GENTLY SO THE NEEDLES DO NOT MOVE. IF THEY DO RETURN TO VEHICLE PLUG IT IN AND LET IT RESET IT SELF.YOU WANT THEM WHERE THEY ARE WHEN THE VEHICLE IS OFF.
Alright now get you a well lighted work space
A piece of foil and a soft towel is also a good idea.
Towel to lay your cluster on when your done pulling it apart, and foil to solder over.
Begin by un-clipping the cluster apart.
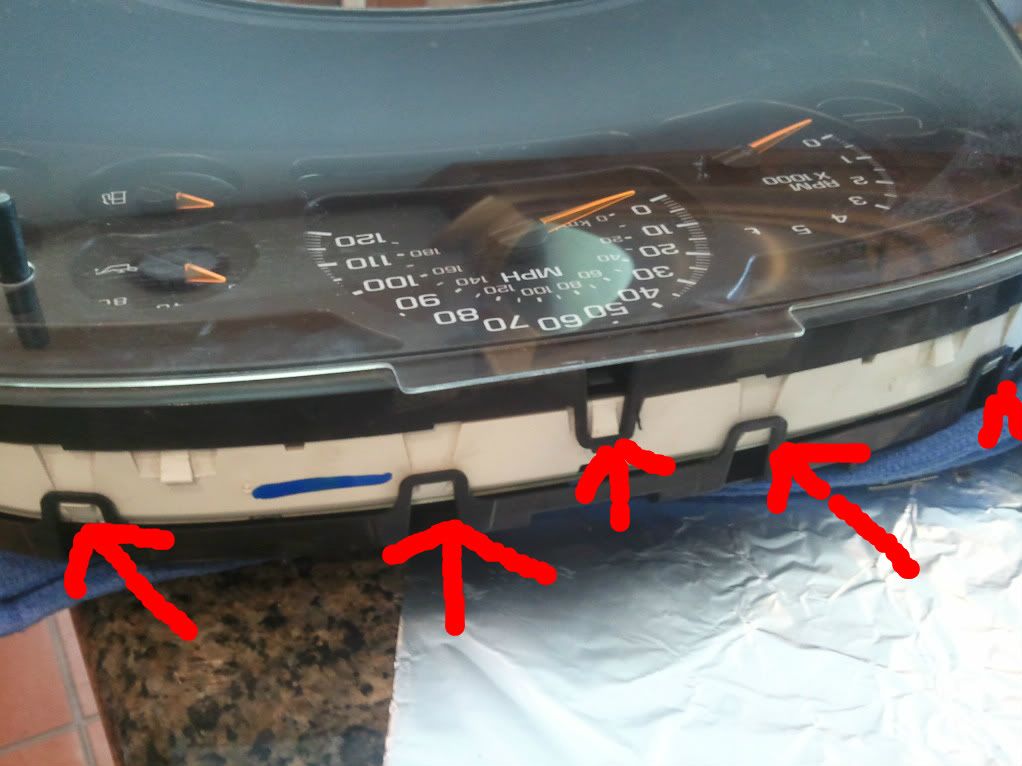
The bottom is where you might need the flat head to pry these tabs.
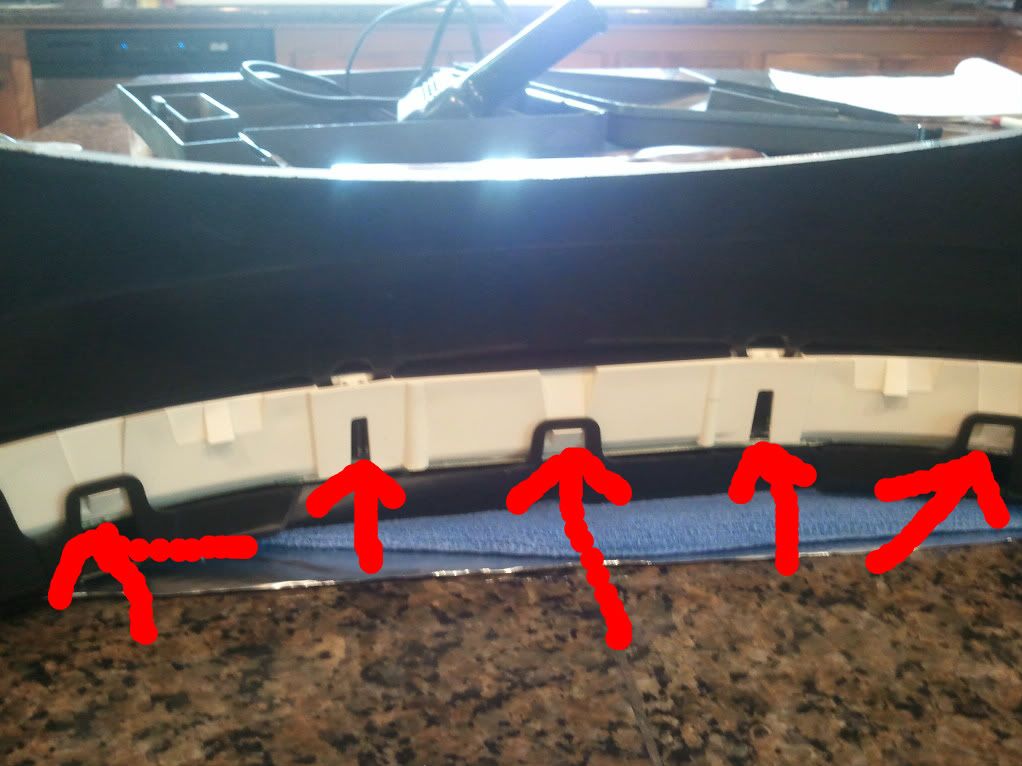
Once your done remove both the top and bottom and you will have something like this.
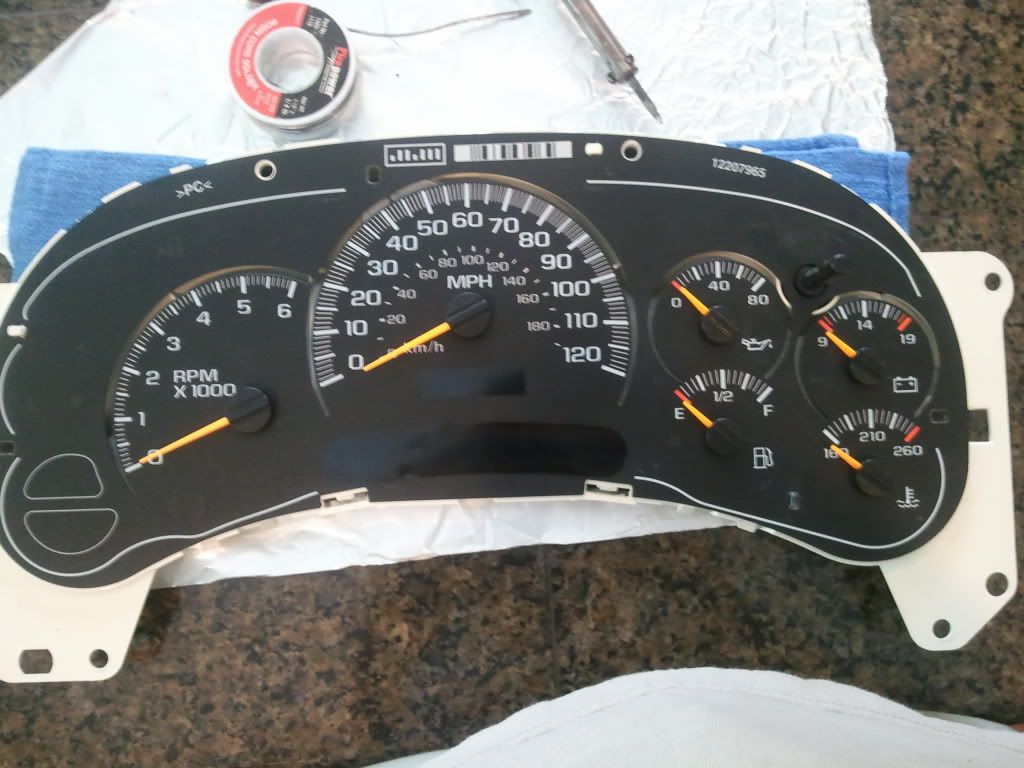
Time for some fun.... removing the needles.
Check to make sure they are all in place as they would be when the vehicle is off.
PLACE A PIECE OF TAPE WHERE THE NEEDLES ARE AND MARK THE TIP OF WHERE THE NEEDLES ARE WITH A SHARPIE ON THE TAPE
(I do not have a picture of this step.)
Now that your needles are marked DO NOT MOVE THEM, if they do move place them back where your mark is.
Slide the fork under the needle and pull straight up. It make take a little force/effort but it will slide off. Remove all needles.
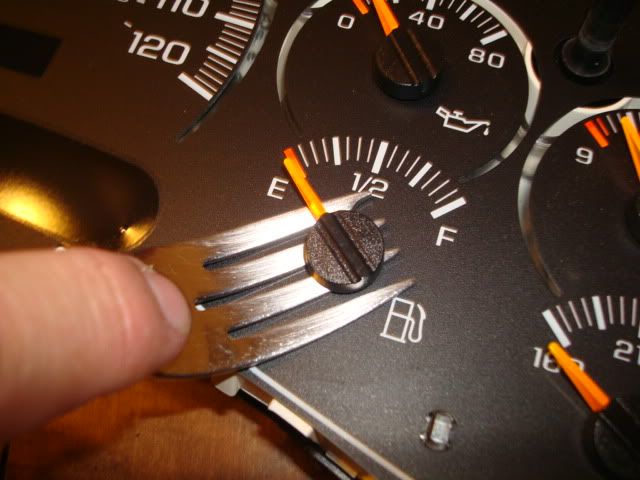 (taken from scottyboy)
Once all of your needles are removed, remove the layover. You should now have this.
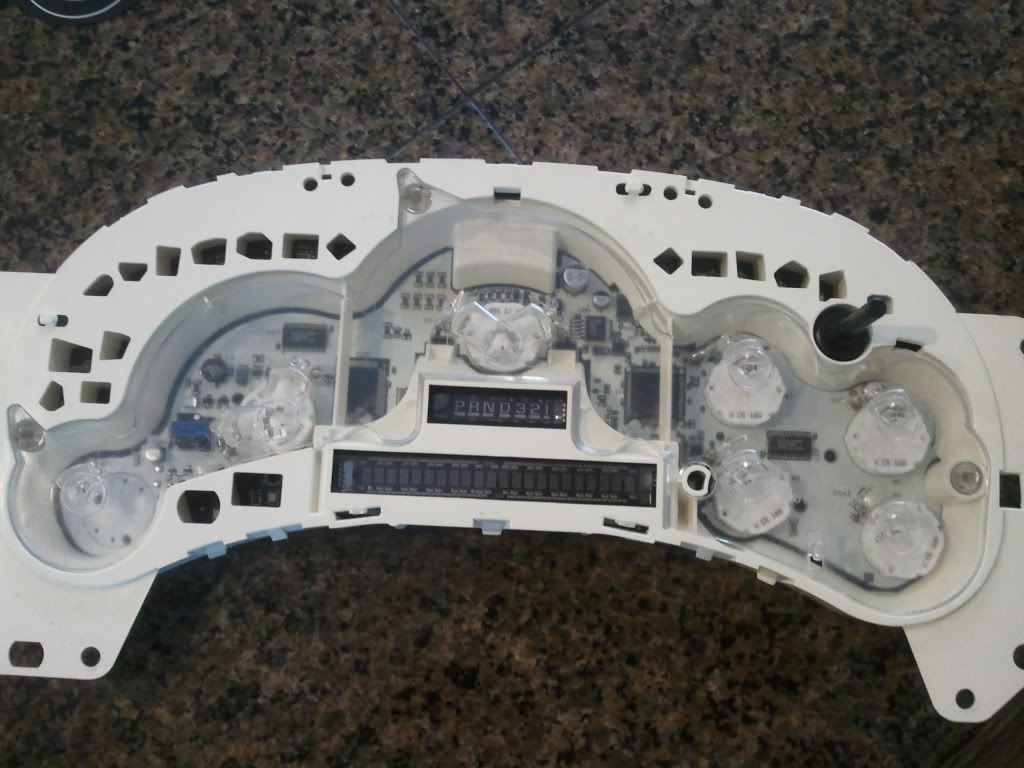
Now remove the rest of the plastics.
You will have this.
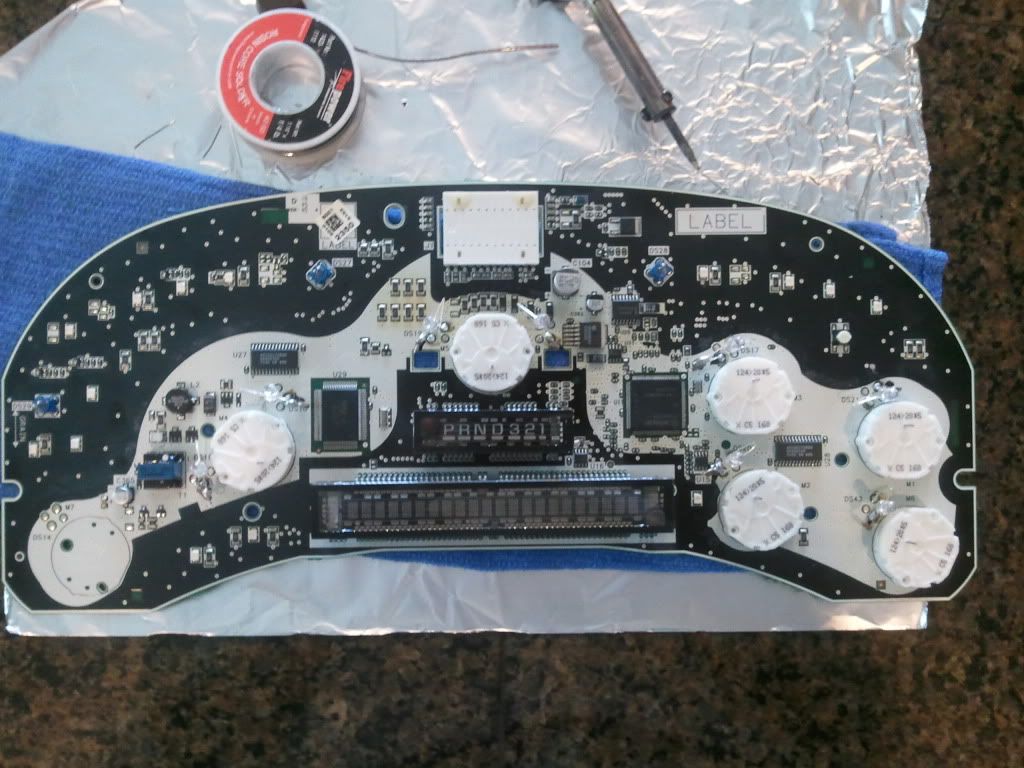
You basically have a circuit board so lay it on a towel or something soft.
(its a good idea to plug your soldering iron in to get it heated up)
You must now find all the positive poles where the lights are because LEDs are polarity sensitive and the cluster isnt marked for positive and negative.. You do this by going back into your vehicle with a Digital MultiMeter and plugging the cluster in and testing each side of the light to find which is positive and negative. Mark them with a sharpie.
You will be checking these lights.
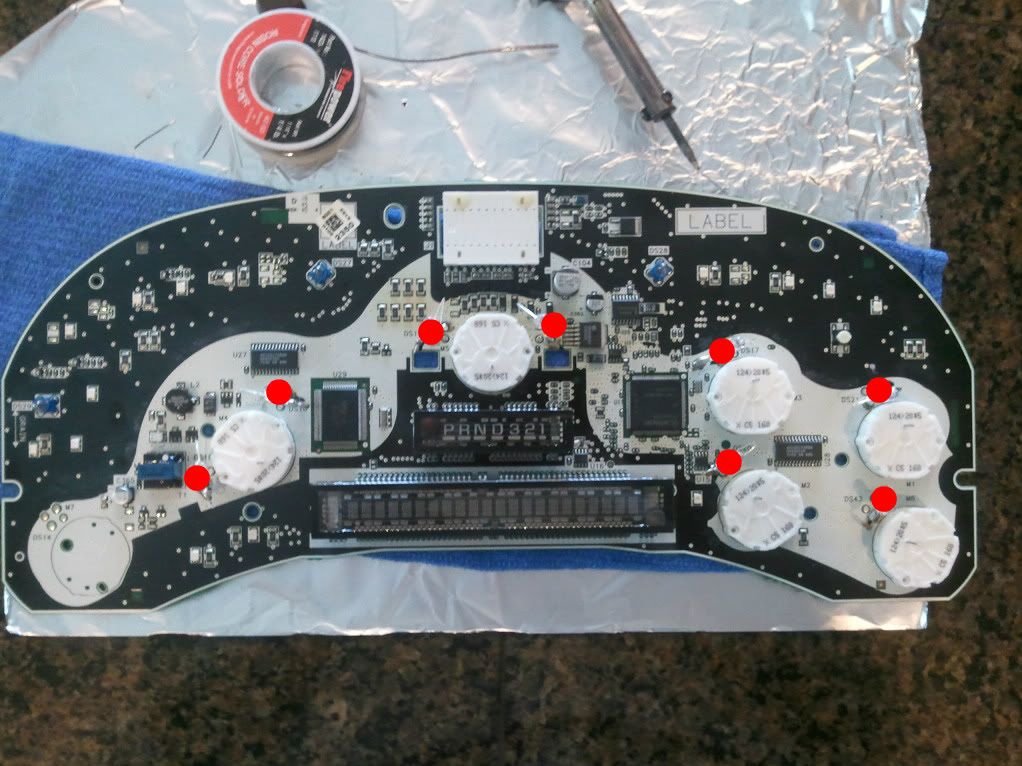
I HAVE MINE MARKED. THE ONES MARKED ARE POSITIVE. YOU CAN GO OFF THIS BUT IM NOT SURE IF EVERY CLUSTER IS THE SAME.... ALTHOUGH IT SHOULD BE AND I DONT SEE WHY NOT. IT WOULD SAVE YOU A LOT OF TIME AND FRUSTRATION
This cluster is for a 2005 GMC Sierra 1500. The following pictures you will see black marks, that is the positive. The opposite side is the negative.
I snapped the pictures fast, just use the surroundings to help you pin point.
batt & water temp
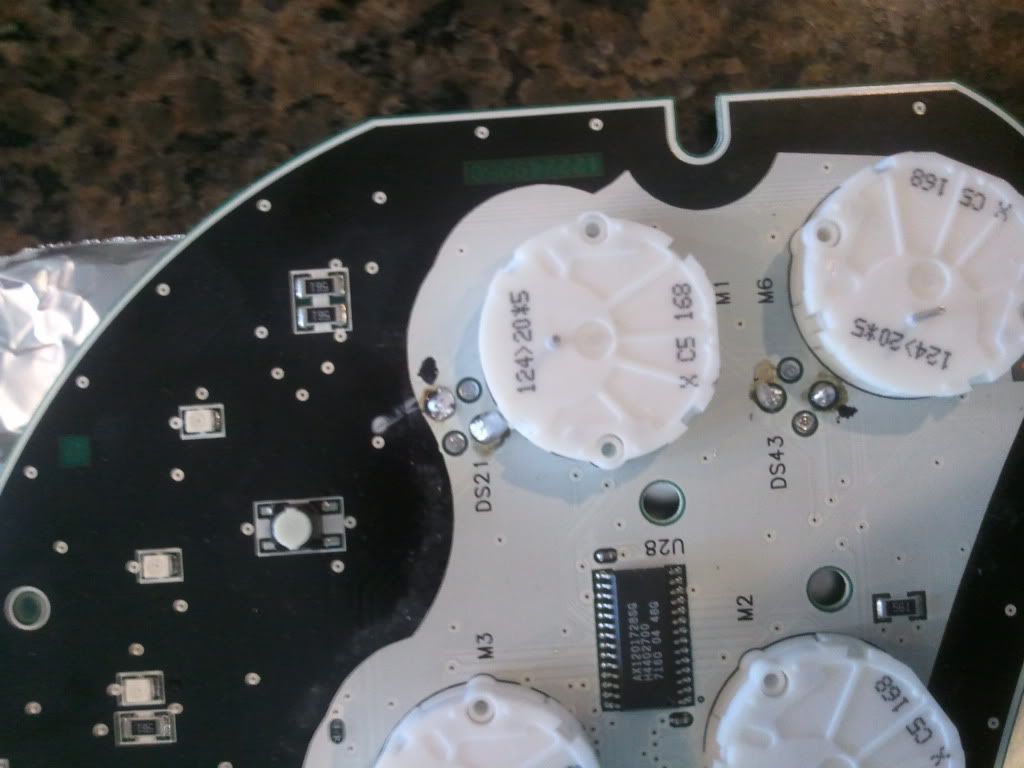
fuel & oil psi
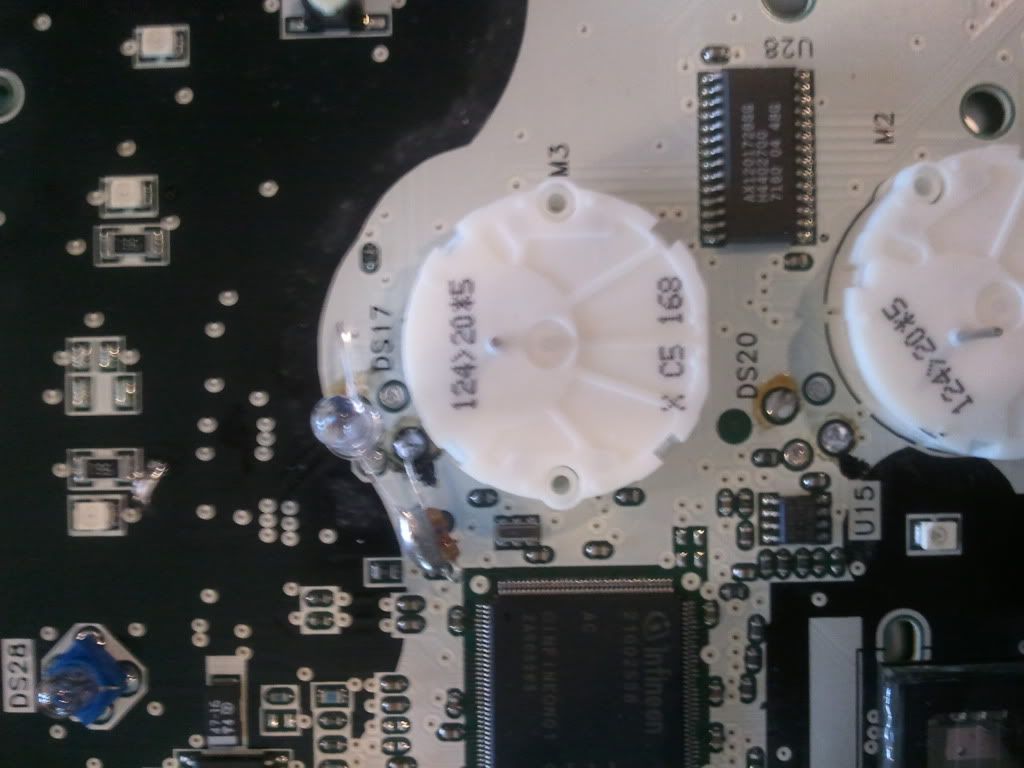
speedo
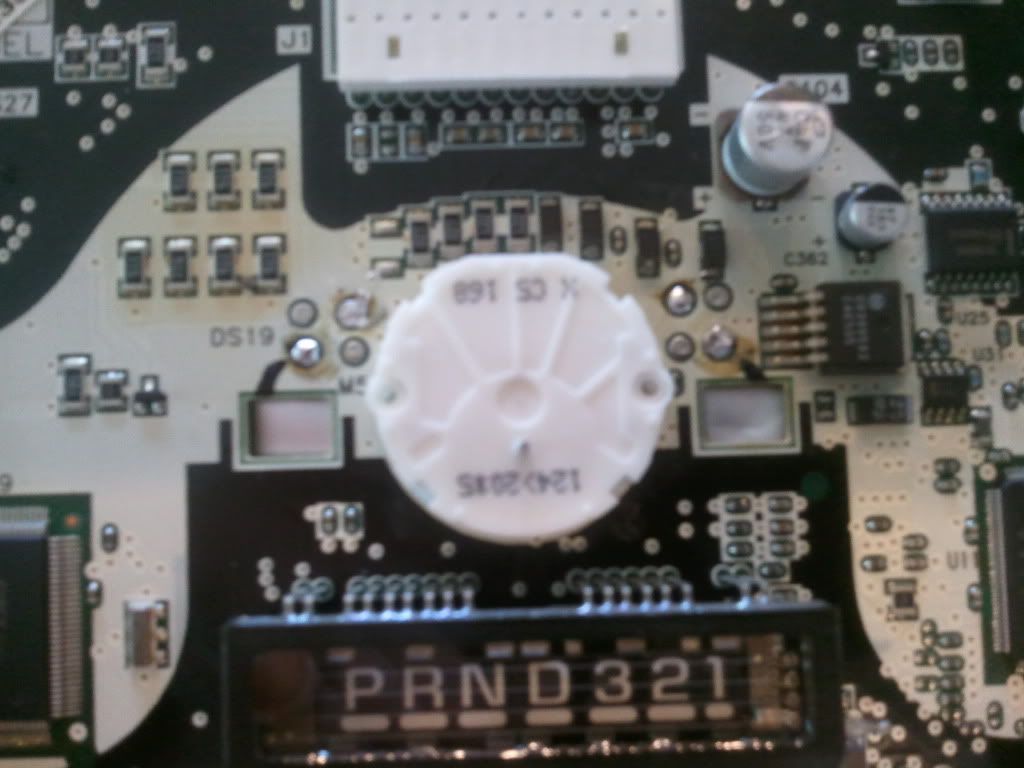
rpm
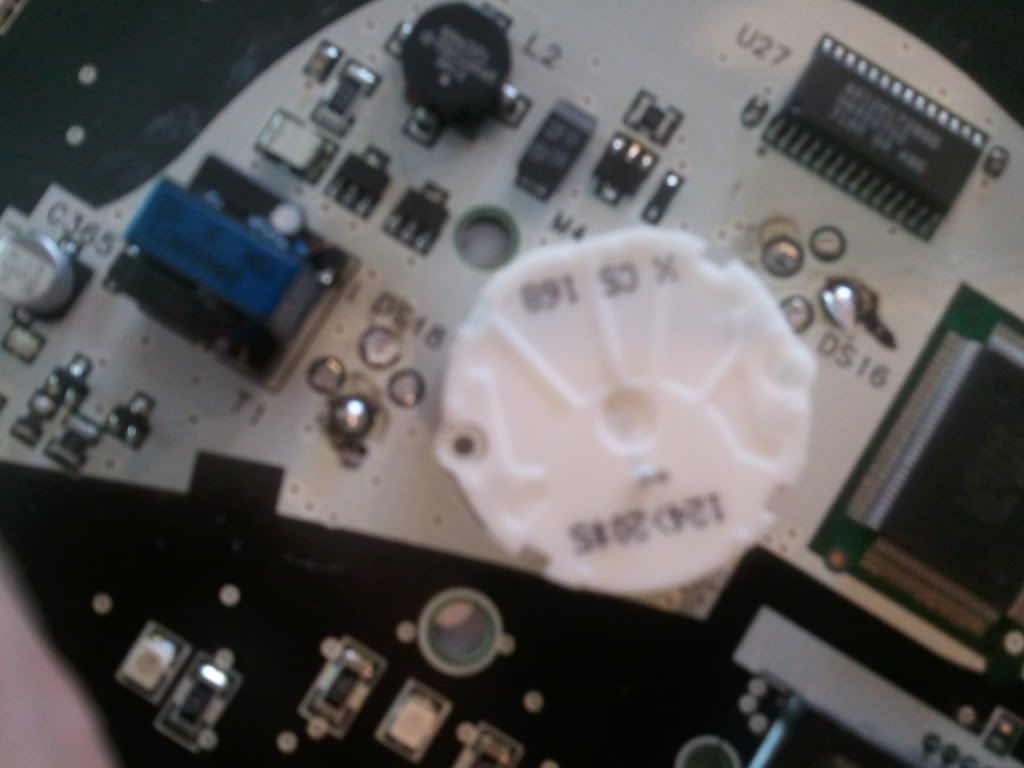
Ok so once you got all your marks done lets get those old halogen lights out. Take your soldering iron and press it gently on the solder point until the solder melts, repeat on the other side and wiggle light out. Remove all 8 of the lights.
So now you need the LEDs in.
First lets start by making up all your LED and Resistor connections.
The resistor needs to be on the positive side of the LED.
(positive side is normally the longer leg off the led)
Cut the positive leg on the LED to about a 1/4 inch. Cut both side of the resistor down to a 1/4 inch.
Now take your positive leg on your led that is 1/4 inch long and solder it together with the resistor that is also cut to 1/4 long.
Once its soldered together and cooled stretch it out straight and cut the negative leg the same length as the positive with the resistor.
The reason why you cut them is so they fit when you put the cluster together.
Do 8 of them.
This is why i said order extra, for I messed alot up.
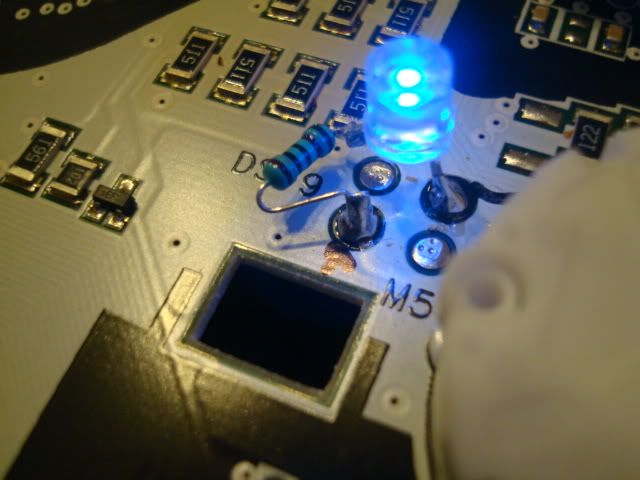
(taken from scottyboy for I have no real closeup)
Now take your led and solder the positive side with the resistor to the positive on your cluster and the negative to the negative.
There may be enough solder on the cluster where you do not need to add any. The best way to add solder if there isnt enough is take some solder and over your foil melt some onto the end on which you need it. Then bring it back to cluster where your connecting it. Touch the led legs on the soldering point on the cluster and melt the solder you added to the leg.
Once your done mash the leds down like in the picture above, also make the led point straight up. Make sure no connection are touching, and no solder from the + or - is connecting.
Go back to your vehicle check to make sure all of them light up and none are flickering.
Go back and repeat steps above but backwards to reassemble your cluster.
You will now have something like this.
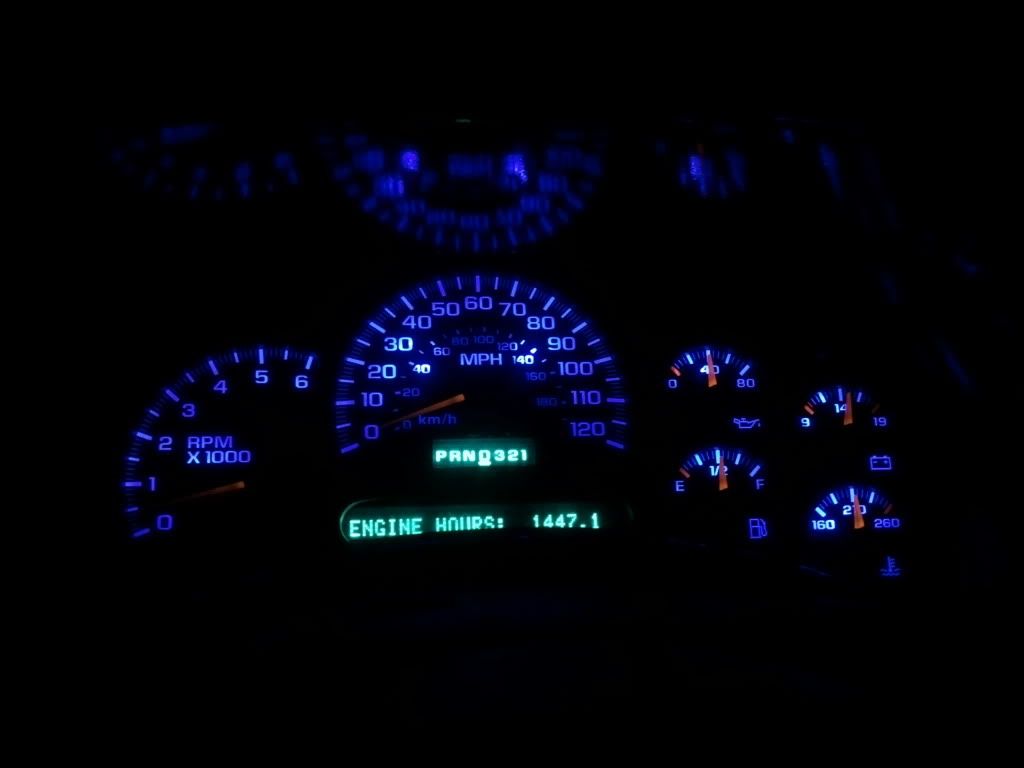
(yes, i know i have 2 hot spots, that is why you mash down the leds. I forgot to press them down all the way.)
Also you can use these bulbs. They are called NeoWedge.... They are direct solder in, the resistor is build it. I swapped them out for these because they weren't blue enough.
Instrument Cluster and Gauge Backlights - Super Bright LEDs
After alot of trial in error, and missing information on the other How to's I decided to make this one.

This is not as hard as it seems!!!
It took me about 2 hours the first time I did this, the second time it took me around 45 minutes.
It takes patients and a steady hand to complete.
I'm 18 and have no background of working with this kind of stuff, just goes to show you that it really isnt all that bad.
I went deeply into detail so clear up any confusion there may be.
I'M NOT RESPONSIBLE FOR ANY DAMAGE YOU MAY CAUSE YOUR CLUSTER.
First you will need:
-7MM ratchet and long enough extension to remove the 4 screws holding the Cluster in place.
-A stout fork... yes the eating utensil
-Flat head screw driver or something to push/pull tabs to take apart your cluster
-Soldering Iron no more than 30 watts as it will get too hot (available at most auto parts stores and wally world)
-Solder
-A pick or something with a pointy end to help move position solder and the LED
-A steady hand and patients
-Sharpie
-Scotch Tape
-8 LEDs 5MM, color of your choice. (always order extra for repairs or accidents... they are cheap!)
I used Oznium Super Bright LEDs
-8 470 Ohm resistors (once again order extra) Resistors

Ok lets get started.
First remove the dash bezel.
Remove the 4 screws with the 7MM that hold the Cluster in place.
Unplug the cluster from the rear.
CARRY THE CLUSTER FLAT AND GENTLY SO THE NEEDLES DO NOT MOVE. IF THEY DO RETURN TO VEHICLE PLUG IT IN AND LET IT RESET IT SELF.YOU WANT THEM WHERE THEY ARE WHEN THE VEHICLE IS OFF.
Alright now get you a well lighted work space
A piece of foil and a soft towel is also a good idea.
Towel to lay your cluster on when your done pulling it apart, and foil to solder over.
Begin by un-clipping the cluster apart.

The bottom is where you might need the flat head to pry these tabs.

Once your done remove both the top and bottom and you will have something like this.

Time for some fun.... removing the needles.
Check to make sure they are all in place as they would be when the vehicle is off.
PLACE A PIECE OF TAPE WHERE THE NEEDLES ARE AND MARK THE TIP OF WHERE THE NEEDLES ARE WITH A SHARPIE ON THE TAPE
(I do not have a picture of this step.)
Now that your needles are marked DO NOT MOVE THEM, if they do move place them back where your mark is.
Slide the fork under the needle and pull straight up. It make take a little force/effort but it will slide off. Remove all needles.

Once all of your needles are removed, remove the layover. You should now have this.

Now remove the rest of the plastics.
You will have this.

You basically have a circuit board so lay it on a towel or something soft.
(its a good idea to plug your soldering iron in to get it heated up)
You must now find all the positive poles where the lights are because LEDs are polarity sensitive and the cluster isnt marked for positive and negative.. You do this by going back into your vehicle with a Digital MultiMeter and plugging the cluster in and testing each side of the light to find which is positive and negative. Mark them with a sharpie.
You will be checking these lights.

I HAVE MINE MARKED. THE ONES MARKED ARE POSITIVE. YOU CAN GO OFF THIS BUT IM NOT SURE IF EVERY CLUSTER IS THE SAME.... ALTHOUGH IT SHOULD BE AND I DONT SEE WHY NOT. IT WOULD SAVE YOU A LOT OF TIME AND FRUSTRATION
This cluster is for a 2005 GMC Sierra 1500. The following pictures you will see black marks, that is the positive. The opposite side is the negative.
I snapped the pictures fast, just use the surroundings to help you pin point.
batt & water temp

fuel & oil psi

speedo

rpm

Ok so once you got all your marks done lets get those old halogen lights out. Take your soldering iron and press it gently on the solder point until the solder melts, repeat on the other side and wiggle light out. Remove all 8 of the lights.
So now you need the LEDs in.
First lets start by making up all your LED and Resistor connections.
The resistor needs to be on the positive side of the LED.
(positive side is normally the longer leg off the led)
Cut the positive leg on the LED to about a 1/4 inch. Cut both side of the resistor down to a 1/4 inch.
Now take your positive leg on your led that is 1/4 inch long and solder it together with the resistor that is also cut to 1/4 long.
Once its soldered together and cooled stretch it out straight and cut the negative leg the same length as the positive with the resistor.
The reason why you cut them is so they fit when you put the cluster together.
Do 8 of them.
This is why i said order extra, for I messed alot up.

(taken from scottyboy for I have no real closeup)
Now take your led and solder the positive side with the resistor to the positive on your cluster and the negative to the negative.
There may be enough solder on the cluster where you do not need to add any. The best way to add solder if there isnt enough is take some solder and over your foil melt some onto the end on which you need it. Then bring it back to cluster where your connecting it. Touch the led legs on the soldering point on the cluster and melt the solder you added to the leg.
Once your done mash the leds down like in the picture above, also make the led point straight up. Make sure no connection are touching, and no solder from the + or - is connecting.
Go back to your vehicle check to make sure all of them light up and none are flickering.
Go back and repeat steps above but backwards to reassemble your cluster.
You will now have something like this.

(yes, i know i have 2 hot spots, that is why you mash down the leds. I forgot to press them down all the way.)
Also you can use these bulbs. They are called NeoWedge.... They are direct solder in, the resistor is build it. I swapped them out for these because they weren't blue enough.
Instrument Cluster and Gauge Backlights - Super Bright LEDs
Last edited:


